Why Are My Texture Files Not Appearing When I Try to Upload Them Into Mcreator
Importing and Exporting CAD Files
PRO If you're a SketchUp Pro user, y'all tin import or export CAD files, which apply the .dwg or .dxf file formats.
Before you import a file, it's helpful to know what CAD entities SketchUp Pro does and doesn't support and how to prepare your CAD file for best results. Then, you can walk through the bones importing steps outlined in this article. After yous're washed importing, bank check out Starting with a CAD File in SketchUp Pro, which offers several tips and tricks for handling imported CAD geometry.
If you're exporting a SketchUp Pro file to a CAD format, how you lot consign a CAD file depends on whether information technology's a 2D file, such as a floor plan, or a 3D model. In this article, y'all also notice how SketchUp data is exported into CAD format.
Table of Contents
- Understanding what CAD elements SketchUp tin can import
- Preparing a CAD file for import into SketchUp
- Importing a CAD file into SketchUp
- Understanding how SketchUp data is exported to CAD format
- Exporting a SketchUp Model as a second CAD file
- Exporting a SketchUp Model as a 3D CAD file
Understanding what CAD elements SketchUp can import
The following table outlines what CAD elements SketchUp does and doesn't back up. If an chemical element isn't supported, SketchUp just ignores it when y'all import the CAD file.
| Supported CAD Entities | Unsupported CAD Entities |
|---|---|
| Arcs | Proprietary ADT or ARX objects |
| Circles | Dimensions |
| Entities with thickness | Hatching |
| Faces | Text |
| 3D faces | XREFs |
| Layers | |
| Lines and supported Line Styles | |
| Materials | |
| Polyline-based solids | |
| Nested blocks | |
| AutoCAD regions | |
| Point | |
| Ellipse | |
| Spline | |
| Raster Image |
Preparing a CAD file for import into SketchUp
When you have a few steps to check and prepare your CAD file before import, yous can make certain all the data you demand imports into SketchUp and streamline the import process. The following sections outline what yous need to wait for and how to resolve any potential conflicts betwixt CAD elements and SketchUp.
Tip: Y'all don't want to lose details in your original CAD file. Remember to create a copy of the CAD file and prepare that copy for importing into SketchUp.
Modify unsupported elements
If you demand to import unsupported CAD elements into SketchUp, try exploding those elements in CAD then they become primitive CAD drawing elements that SketchUp does support.
For case, when y'all explode CAD objects into block entities, they import into SketchUp as components. If you explode the CAD block entities into polylines, the polylines import into SketchUp every bit lines or polylines.
Delete unnecessary layers
In an imported CAD file, SketchUp automatically discards any entities that take no 3D relevance, such every bit text, dimensions, hatching, so on. Notwithstanding, SketchUp won't discard the layers holding these entities. To avoid a bunch of empty layers in SketchUp, you lot may want to purge whatever unused layers through Statistics on the Model Info dialog.
Movement geometry close to the origin
In SketchUp, geometry that'due south many miles or kilometers away from the origin (0,0) can cause performance issues. To avoid these problems, cheque the placement of geometry in your CAD file before you import the CAD file into SketchUp.
For example, say you're importing Autodesk AutoCAD DWG files, such as ceremonious site plans, in lodge to work with the contour lines. If the graphic or geometry is far away from the origin, move it shut to the origin before importing the CAD file into SketchUp.
Alternatively, deselect the Preserve Drawing Origin selection in SketchUp's DWG/DXF import options, as explained in Importing a CAD file into SketchUp, later in this article.
Reduce the file size if needed
Mostly, CAD files import into SketchUp successfully when the file size is 15MB or less. When yous import larger CAD files, the import can take a long time or may fail. Conversely, the smaller your CAD file size, the quicker and easier the import. As well, afterward a circuitous CAD file is imported into SketchUp, yous may notice that SketchUp's operation slows downward. That'south because lines and faces in SketchUp comprise more data than their CAD equivalents.
Tip: For best results with imported CAD files, go on the size of imported files to a minimum. Hither are a few tips for minimizing a CAD file earlier you import information technology into SketchUp:
- Import only the necessary geometry. SketchUp models tin can exist designed to be as authentic as models in CAD. However, SketchUp is not designed for the same type of line-intensive drawings done in CAD software. In your CAD file, make clean up or remove whatsoever content that you don't need to utilise after y'all import the CAD file into SketchUp. You might simplify the CAD file to just walls — and perchance doors and windows if you lot want to model those in your SketchUp file, also.
- Separate levels of item amid different CAD files. If your CAD file holds lots of necessary geometry, consider whether you intermission one file into a few smaller files. For example, one imported CAD file can contain site plan information, some other can have a floor program, and a final file can have a specific detail.
Bank check the unit of measure
If possible, find out the unit of measure out used to create the CAD file. When you import the CAD file into SketchUp, y'all need to know whether your file uses inches, feet, or a metric unit of measurement. That way, you lot can friction match the SketchUp model'due south units to the CAD file'due south units and thus maintain the calibration and dimensions of your imported CAD geometry.
In SketchUp 2018 and afterward, you also accept the option to import the model using the units specified in the CAD file. In the Units dropdown, select Model Units from the list, which tells SketchUp to attempt to match the units saved in the CAD file. If SketchUp is unable to determine what unit of measurement was used to create the CAD file, it volition default to 1 CAD unit equals 1 inch in SketchUp.
Save in a SketchUp-compatible CAD file format
When SketchUp imports a CAD file, SketchUp strips the information to its basic geometric components. So no matter what AutoCAD file format you use (such as 2013 or 2018), the end result is substantially the same. To maximize compatibility between a CAD file and SketchUp, however, saving your CAD file in the Release 13 or Release 14 format works best.
Importing a CAD file into SketchUp
Later yous've checked and prepared your CAD file, you're ready to import it into SketchUp. The following steps walk you through the import process for your operating arrangement:
- In SketchUp, open up the SketchUp model into which you want to import your
.dwgor.dxffile. - Select File > Import. An Import dialog box appears.
- Navigate the the place your difficult bulldoze where your CAD file is saved.
- From the Files of Type drib-downward list, select AutoCAD Files (*.dwg, *.dxf).
- Select the file yous want to import.
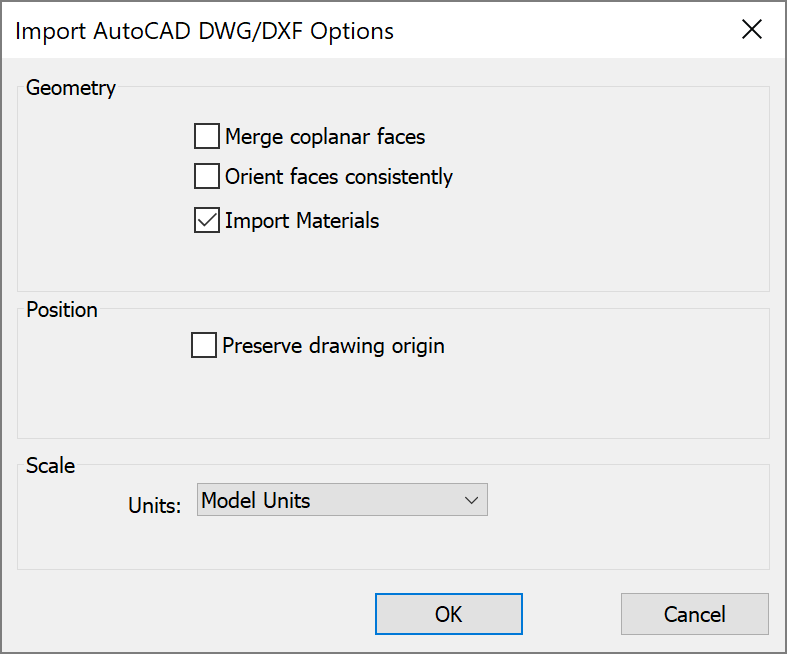
- Click the Options push. The Import AutoCAD DWG/DXF Options dialog box appears, equally shown in the following figure.
- (Optional) In the Geometry area, select your preferences for the following options:
- select Merge Coplanar Faces to tell SketchUp to automatically remove triangulated lines from planes.
- Selecting the Orient Faces Consistently box tells SketchUp to analyze the direction of imported faces and orient the faces so that their management is compatible.
- (Optional) Select the Preserve Drawing Origin checkbox to identify the imported geometry at the origin defined in the .dwg or .dxf file. Leave the checkbox deselected if y'all desire to place the imported geometry about the SketchUp origin.
- (Optional) To import geometry at the right scale, select the unit of measurement used in your CAD file from the Units drib-down list. Your options are Model Units, Inches, Feet, Yards, Miles, Millimeters, Centimeters, Meters and Kilometers.
Tip: If yous don't know the units used in the original file, select Model Units so that SketchUp turns one CAD unit into 1 inch in SketchUp. Or use a large unit of measurement type, such as anxiety or meters. Then you lot can resize the model as necessary after it'south imported.
Alert: If you select a modest unit, such every bit millimeters, but the model was originally intended to display in anxiety, yous can unintentionally create itty-bitty faces that will be lost on import. For SketchUp to recognize a face, the confront must be .001 square inches or larger.
- Click OK in the Import AutoCAD DWG/DXF Options dialog box.
- Back in the Import dialog box, click the Import button, and SketchUp Pro begins importing your CAD file.
Tip: When importing a LayOut file created using the "Export for SketchUp" characteristic, employ the Merge Coplanar Faces pick for make clean imported faces.
Tip: You can also elevate and drib importable files into the drawing area. After you drop the file, whatsoever relevant Import dialog box opens so yous can select your desired options.
SketchUp For Web
After y'all've checked and prepared your CAD file, you're set up to import it into SketchUp Shop. The following steps walk you through the import process:
- In SketchUp Shop, open the SketchUp model into which you want to import your .dwg or .dxf file.
- Select the File icon (
 ). An File menu appears, select Insert
 - You can select the Trimble Connect icon or the Computer icon for a local file.
- (Optional) You lot can too drag & drop a file from an Explorer or Finder window directly into SketchUp Store.
- If y'all choose to open the file locally, navigate to the identify on your difficult drive where your CAD file is saved.
- Select "All Files" as the desired format.
- Select the file yous want to import.
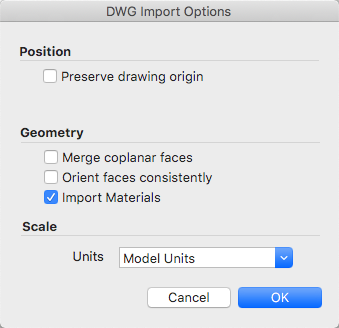
- The Import AutoCAD DWG/DXF Options dialog box appears, as shown in the following figure.
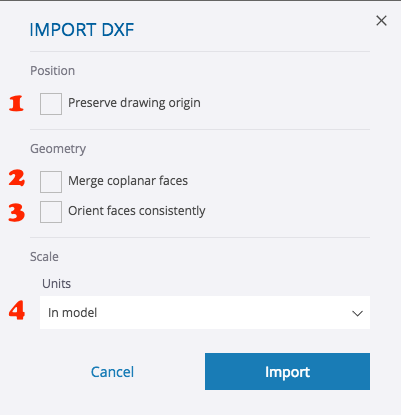
- (Optional) Select the Preserve Drawing Origin (#ane In a higher place) checkbox to identify the imported geometry at the origin defined in the .dwg or .dxf file. Leave the checkbox deselected if y'all want to place the imported geometry almost the SketchUp origin.
- (Optional) In the Geometry area, select Merge Coplanar Faces (#2 To a higher place) to tell SketchUp to automatically remove triangulated lines from planes. Selecting the Orient Faces Consistently (#3 To a higher place) box tells SketchUp to analyze the management of imported faces and orient the faces so that their direction is uniform.
- (Optional) To import geometry at the correct scale, select the unit of measurement used in your CAD file from the Units driblet-down list (#4 Above). Your options are Model Units, Inches, Anxiety, Yards, Miles, Millimeters, Centimeters, Meters and Kilometers.
- Click Import begin the import process.
Tip: If you lot don't know the units used in the original file, use a big unit type, such every bit anxiety or meters. Then you can resize the model as necessary after it'due south imported.
Warning: If you select a small unit of measurement, such equally millimeters, merely the model was originally intended to display in feet, you tin can unintentionally create itty-bitty faces that volition be lost on import. For SketchUp to recognize a face, the face up must be .001 foursquare inches or larger.
Tip: If you take a floor plan or other vector graphics in an Adobe Illustrator (.eps) file, you can export the .eps file to .dwg or .dxf format in Illustrator. And then import the vector graphics following the preceding steps. If, in Adobe Illustrator, yous first reduce the number of anchor points that define curves, y'all tin improve the file's performance in SketchUp. In particular, when y'all extrude faces from curves that contain lots of line segments, the SketchUp file size can increment dramatically.
Understanding how SketchUp data is exported to CAD format
Before you export a SketchUp model to a CAD file format (.dwg or .dxf), you may find it helpful to understand how SketchUp data is translated into the CAD format that y'all choose. Here's what you demand to know:
- SketchUp faces are exported as a triangulated polyface mesh with interior splframe hidden lines (if applicable). This conversion helps to simulate the appearance of your SketchUp file, fifty-fifty when all exported faces are triangular.
- SketchUp uses the current units gear up in the Units pane of the Model Info dialog box as a reference for translation to a
.dwgor.dxffile. For instance, if the current Model Info unit setting is Decimal and Meters, then AutoCAD must exist set to decimal for the units to interpret correctly every bit meters when you open the exported file in AutoCAD. - Duplicate line entities aren't created on top of a p-line entity.
Exporting a SketchUp Model equally a 2d CAD file
When export your model view as a 2D CAD file, you can choose the calibration and a number of line options. The result is a 2nd vector file in .dwg or .dxf format that you can open in your CAD program.
Follow these steps to export a second CAD file:
- To maintain your model'southward scale in the exported file, in SketchUp, select Camera > Parallel Projection. And so set your view to 1 of SketchUp's standard views by selecting Camera > Standard Views and selecting an option from the submenu that appears. (See Viewing a Model for details nearly the model view options.)
- Select File > Export > 2D Graphic.
- Navigate to the identify where you want to save your exported file.
- (Optional) Change the file name if you'd like to name the exported file something other than the SketchUp file'south current name.
- Select either the
.dwgor.dxffile blazon. In Microsoft Windows, select this selection from the Relieve Every bit Type drib-downwardly list. On a Mac, use the Format drop-down list. - Click the Options push to set the scale and line options, which are explained in particular in the upcoming list. When you're done, click OK in the DWG/DXF Hidden Line Options dialog box (Microsoft Windows) or the Consign Options dialog box (Mac Os X).
- Click Export and your CAD file is saved in your selected location.
In the post-obit effigy, y'all come across the line options dialog box for your current operating system. The post-obit list introduces your options and then that the lines in your exported file meet your needs:
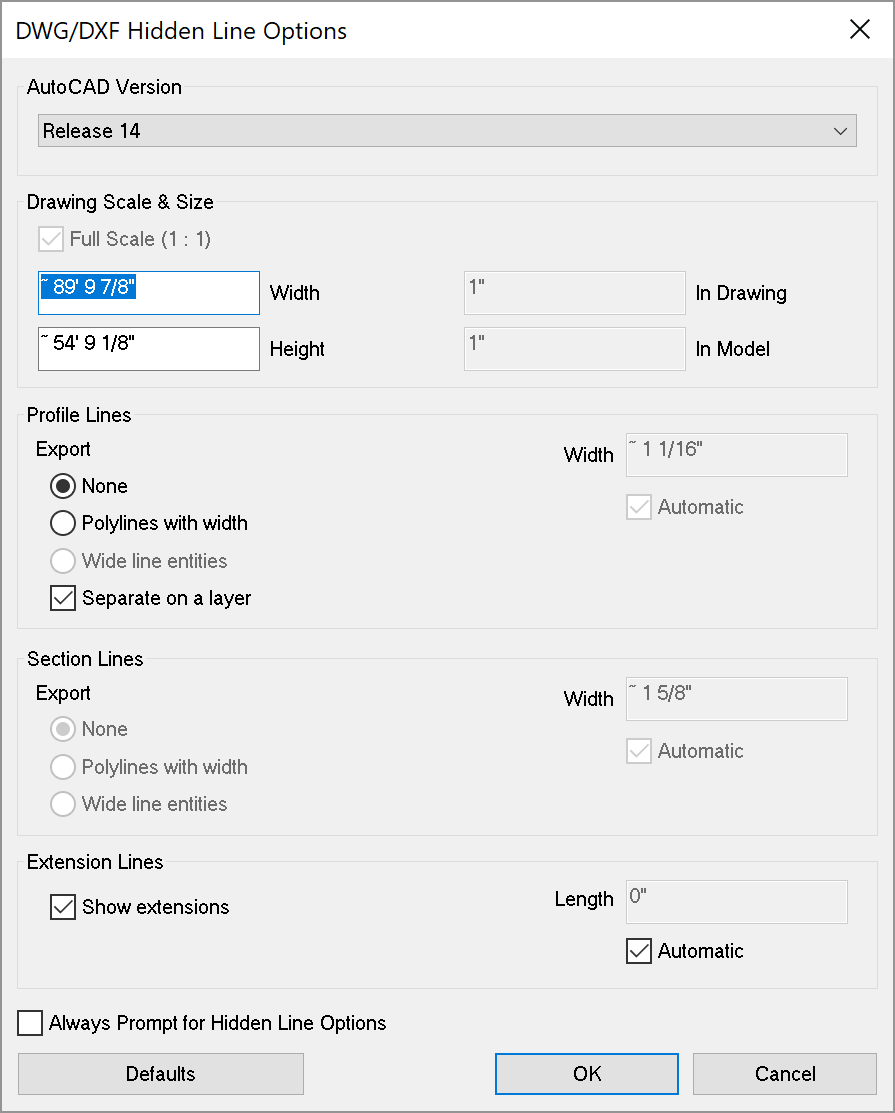

- AutoCAD Version: Select what version of AutoCAD you'd similar to use to open the exported file.
- Drawing Scale & Size: The Total Scale checkbox is selected by default. Notwithstanding, if you deselect that checkbox, you can prepare a custom scale. In the In Drawing box, type the bodily measurement you lot desire to use to set your scale. In the In Model box, type the value for scaling your exported model. For example, for a scale of 1:4, type 1' in the In Model box and 4' in the In Drawing box.
- Profile Lines: Here, you can customize how profile lines appear in your exported file. You can set the line width as follows:
- Select None to export profile lines at the standard width.
- Select Polylines with Width to export profile lines every bit AutoCAD polylines. When yous select this selection, you can leave Automatic selected then that the exported lines friction match the profile line width. If you deselect Automated, yous can enter a custom width in the Width box.
- Select Wide Line Entities to export profile lines equally AutoCAD wide line entities.
The Separate on a Layer checkbox, which is selected past default, creates a layer for profile edges. If you've used SketchUp layers to control visibility, note that SketchUp layer assignments don't translate directly when you lot export a SketchUp file to a 2d CAD file. - Department Lines: If you export department lines or a section slice, these export options become available. Meet Slicing a Model to Peer Within for details about sections and how to export them.
- Edge Extensions: Some CAD applications might take problems recognizing line endpoints and intersections when your model uses SketchUp line extensions. Deselect the Bear witness Extensions checkbox to toggle extensions off in your exported file. If yous get out Bear witness Extensions selected and deselect the Automatic checkbox, you can enter an exact length for line extensions in the Length box.
In Microsoft Windows, you can select the Always Prompt for Hidden Line Options if y'all'd like to set options in this dialog box someday you export a 2D CAD file. You can likewise restore the default settings past clicking the Defaults push.
Exporting a SketchUp Model as a 3D CAD file
When you export a SketchUp model as a 3D CAD file, you can select what entities are exported. To export your model, follow these steps:
- In SketchUp, select File > Export > 3D Model. The Consign Model dialog box appears.
- Navigate to the location where you want to save your exported file.
- (Optional) Change the file name if you like. By default, the exported file uses the same name equally your SketchUp file name.
- Select either
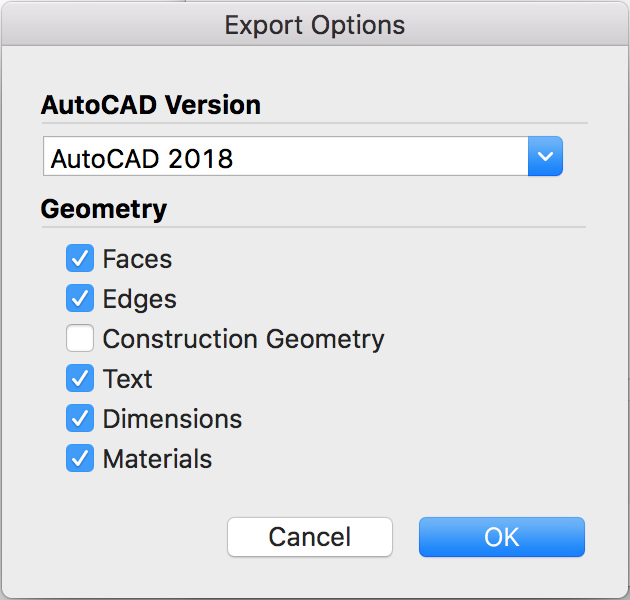
.dwgor.dxfas the file format for your exported file. In Microsoft Windows, select your file type from the Salvage As Type drop-down list. In Mac OS Ten, apply the Format driblet-down list. - Click the Options push button to open the Export Options dialog box, shown in the post-obit figure. From the AutoCAD Version drop-down list, select the version of AutoCAD you'd like to employ to open the exported file. In the Export surface area, select the checkbox for each type of entity that you want to include in the exported file. Click OK when you're washed.
- Back in the Export Model dialog box, click Consign, and your file appears in the location where you chose to save it.

Tip: Export and Import with materials for amend BIM interoperability and workflows using the .dwg format.
Source: https://help.sketchup.com/en/sketchup/importing-and-exporting-cad-files
0 Response to "Why Are My Texture Files Not Appearing When I Try to Upload Them Into Mcreator"
Postar um comentário